


This is a Factory OEM (Original Equipment Manufacturer) GM 3 Button keyless entry remote, aka "key fob".
Genuine OEM electronics in a new aftermarket case.
GM
- 1997-1998 Buick Riviera
- 1997-1998 Buick Skylark
- 1997 Chevrolet S10
- 1997-1999 Chevrolet Astro
- 1997 Chevrolet Blazer
- 1996-2002 Chevrolet Camaro
- 1996-1999 Chevrolet Cavalier
- 1999-2000 Cadillac Escalade
- 1997-2002 Chevrolet Express
- 2003-2007 Chevrolet Kodiak
- 1996-2001 Chevrolet Lumina
- 1996-1999 Chevrolet Malibu
- 1996-1999 Chevrolet Monte Carlo
- 1996-2000 Chevrolet Suburban
- 1996-2000 Chevrolet Tahoe
- 1999-2004 Chevrolet Tracker
- 1997 GMC Jimmy
- 1998-1999 GMC Safari
- 1997-2002 GMC Savana
- 1997-1999 GMC Sierra
- 1997 GMC Sonoma
- 1997-1999 GMC Suburban
- 2003-2007 GMC Topkick
- 1997-2000 GMC Yukon
- 1997-1998 Oldsmobile Achieva
- 1997 Oldsmobile Bravada
- 1997-1999 Oldsmobile Cutlass
- 1997-1998 Pontiac Grand Am
- 1996-2002 Pontiac Firebird
- 1997-1999 Pontiac Sunfire
- 1996-1999 Pontiac Trans Am
- 1996-2000 Saturn SC1
- 1996-2000 Saturn SC2
- 1997-1999 Saturn SL1
- 1997-1999 Saturn SL2
- 1997-1999 Saturn SW1
- 1997-1999 Saturn SW2
Procedure #1 (Buick Skylark; Chevrolet Cavalier, Lumina, & Monte Carlo; Oldsmobile Acheiva & Cutlass; Pontiac Grand Am & Sunfire)
- Collect all remotes that you wish to program. This procedure will erase all previously programmed remotes. You must program all existing and new remotes that you wish to use on the vehicle at this time.
- Locate programming connector on the passenger side of the trunk. Remove any trim or carpeting to access the connector. Connector will be close to the tail light Connector is a port connected to a black and white wire. Connector will not be connected to anything.
- Next you must jump the programming connector. You may use a jumper wire or paper clip. First make contact to the metal connector inside the port with the paper clip or wire. Next touch the other end of the wire or paperclip to a metal surface of the car or bolt.
- Locks will cycle from lock to unlock signaling entering of programming mode.
- Press and hold lock and unlock together on a remote. Locks will cycle again and this remote has been successfully programmed. Repeat this step for any additional remotes.
- Remove jumper wire or paper clip to exit programming mode.
(Chevrolet Malibu, Oldsmobile Cutlass)
- Turn ignition off.
- Locate programming connector in the trunk. It is a plastic connector with two wires black and white leading to it. The connector will not be connected to anything and will be located in the center of the rear shelf.
- Must jump the connectors inside the two terminals of the programming connector. Use a jumper wire or a bent paperclip. Locks will cycle to lock to unlock.
- Hold lock and unlock on the remote being programmed for 15 seconds. Locks will cycle again confirming programming. Repeat for additional remotes.
- Remove jumper wire or clip to exit programming mode.
(Pontiac Firebird & Trans Am)
- Remove Radio fuse from fuse box. Fuse is numbered 17.
- Turn the key from Off to Run position three times (ending in run). Do not start the car. Locks will cycle from lock to unlock signaling entering programming mode.
- Hold Lock and Unlock on the remote being programmed. Doors will cycle again signaling successful programming. Repeat this step for any additional remotes.
- Turn off ignition. Replace radio fuse.
(Chevrolet Cavalier) Classic Body Style Vehicles
- Collect all remotes that you wish to program. This procedure will erase all previously programmed remotes. You must program all existing and new remotes that you wish to use on the vehicle at this time.
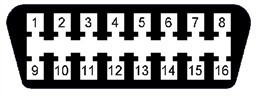
- Locate the Data Link Port underneath the driver side dashboard use image above for reference.
- Jump terminal 8 to terminal 4. Use a jumper wire or bent paper clip to connect the two ports. Locks will cycle from lock to unlock to signal entering programming mode.
- Press and hold lock and unlock button on the remote being programmed. Hold until the locks cycle again signaling successful programming. Repeat this step for any additional remotes.
- Remove the jumper wire or paperclip to exit programming mode.
- Collect all remotes that you wish to program. This procedure will erase all previously programmed remotes. You must program all existing and new remotes that you wish to use on the vehicle at this time.
- Close all doors, insert key into ignition do not turn it.
- Hold the Unlock button on the driver's door DO NOT RELEASE.
- Quickly turn ignition ON OFF, ON OFF. Do not start the car turn the key to the ON position on the cylinder
- Release the Unlock button. Locks will cycle from lock to unlock signally entering of programming mode. If the locks cycle before you release the unlock button the programming will not work. Repeat from step 1.
- Press and hold the Lock and Unlock button on the remote being programmed until the locks cycle again. This signals your vehicle has been successfully programmed. Repeat this step for any additional remote.
- Turn key to the on position to exit from programming mode.
We are proud to offer true OEM key fobs direct to you at up to 80% off dealer prices. There is a catch though, so here it goes:
You need to know the only way to get a NEW OEM key fob is to go to a dealer or authorized reseller of OEM parts, and you will pay dealer prices if you do this and spend hundreds of dollars.
The key fob you are going to purchase from us is used or as we like to say "previously loved". We recycle OEM key fobs and put them through a rigorous refurbishing process so we can guarantee our products and offer them at a reasonable price along with saving the environment. Oh, and we are not robbing you of your hard earned dollars like the stealership does. So if you are good with all of this what are you waiting for? Make your life easier, order a key fob from us and save the world!
