Here are the programming instructions for a 1995 Toyota Avalon Key Fob Remote. If you need an extra Key Fob or Replacement Fob for any vehicle you might have visit us at Keylessentryremotefob.com You can also leave comments or suggestions at the bottom of this blog. If you like what we provide please forward on to your friends & family and share via the social media icons below; people like you are our best advertising tool!
ORDER THIS KEY FOB PART NUMBER HERE: BAB237131-022 or GQ43VT7T
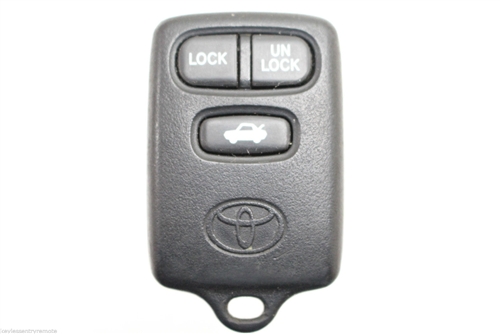
ORDER THIS KEY FOB PART NUMBER HERE: BAB237131-022 or GQ43VT7T
PROGRAMMING OEM WIRELESS DOOR LOCK REMOTE TRANSMITTERS for 1995 – 1997 Toyota Avalon.
The PRG (Program) circuit of the Wireless Door Lock ECU is grounded to perform programming.
NOTE: Up to two remotes can be programmed to operate each vehicle.
This can be accomplished at a satellite location, the Light Failure Sensor, located in the trunk near the left trunk hinge.
1.With the key OUT of the ignition switch (cannot program with key in the ignition)
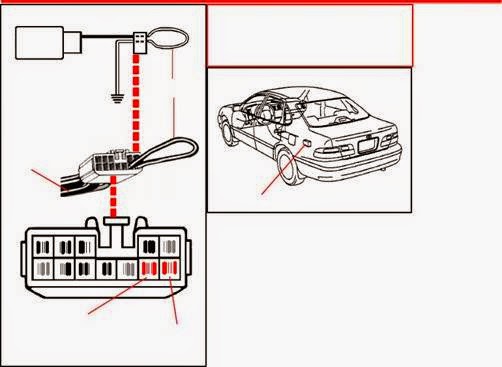
2. Locate and disconnect the Light Failure Sensor from the vehicle harness.Pull back the trunk liner along the left side of the trunk to expose the light failure sensor – it is the plastic box with white harness connector. You will need to remove the sensor by releasing the clip which holds it in place.
Remove the failure sensor box from the actual harness by releasing the harness clip. It is the harness end that will be used for programming.
3.Using a suitable jumper wire (any small wire), connect terminal number 12 PRG (black) to terminal number 11, GND (white/black) of the 12 cavity Light Failure Sensor connector.
See illustration. 11 and 12 are the two final terminals along the lower complete row.
3a. The vehicle confirms programming mode by cycling the power door locks(lock–unlock) once in addition to activating the trunk opener motor tounlock.
4. Depress, then release, any button on the remote. The vehicle confirms registration by cycling the power door locks (lock–unlock) once again.
5. To program an additional remote, repeat step 3 to 5.
6. Disconnect the jumper wire to exit programming mode.
7. Test remote(s).
** A maximum of 2 keyless remotes can be programmed.
** Programming a keyless remote erases all other keyless remotes. Both keyless remotes must be programmed at the same time.
Was This Information Useful? Please take a moment to Like / Follow us and share via social media below. It is people like you that help spread the word about us. It helps so much! Thanks for visiting and sharing with your friends and family!The PRG (Program) circuit of the Wireless Door Lock ECU is grounded to perform programming.
NOTE: Up to two remotes can be programmed to operate each vehicle.
This can be accomplished at a satellite location, the Light Failure Sensor, located in the trunk near the left trunk hinge.
1.With the key OUT of the ignition switch (cannot program with key in the ignition)
2. Locate and disconnect the Light Failure Sensor from the vehicle harness.Pull back the trunk liner along the left side of the trunk to expose the light failure sensor – it is the plastic box with white harness connector. You will need to remove the sensor by releasing the clip which holds it in place.
Remove the failure sensor box from the actual harness by releasing the harness clip. It is the harness end that will be used for programming.
3.Using a suitable jumper wire (any small wire), connect terminal number 12 PRG (black) to terminal number 11, GND (white/black) of the 12 cavity Light Failure Sensor connector.
See illustration. 11 and 12 are the two final terminals along the lower complete row.
3a. The vehicle confirms programming mode by cycling the power door locks(lock–unlock) once in addition to activating the trunk opener motor tounlock.
4. Depress, then release, any button on the remote. The vehicle confirms registration by cycling the power door locks (lock–unlock) once again.
5. To program an additional remote, repeat step 3 to 5.
6. Disconnect the jumper wire to exit programming mode.
7. Test remote(s).
** A maximum of 2 keyless remotes can be programmed.
** Programming a keyless remote erases all other keyless remotes. Both keyless remotes must be programmed at the same time.
Subscribe To Our Social Networks For Special Discounts, Offers, & Contests!
By Keyless Entry Remote Inc
