
Programming Procedures
NOTE: Dodge Dakota vehicles must be programmed by a professional locksmith or dealership.
Programming for 96-97 Dodge Ram Pickup; 98 Dodge Ram Van
Obtain all remote transmitters for this vehicle.
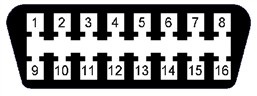
1. Locate the Data Link Connector (DLC). It will be under the dash on the drivers side. Use the diagram above to identify pins 1 and 4. Notice that the DLC connector is tapered. You can use this to help identify the proper pins. Using a suitable jumper wire jump pin 1 to pin 4. Ensure that there are metal connector ends in the cavities that are referenced in this procedure. Once the jumper wire is installed it needs to remain there throughout this process until instructed to remove.
2. Insert key into the ignition and turn the ignition switch to the ON position. (ON is turning ignition switch as far as you can without cranking the engine)
3. If jumper wire is installed properly, once ignition is ON the door locks will Lock and Unlock once.
4. Now press any button on the first remote to be programmed. To show that the signal from remote is recognized the door locks will cycle again (Lock and Unlock) and the rear window will release if equipped. This step must be repeated for all remaining remotes to be programmed to vehicle.
5. Once all remotes are programmed remove jumper wire and turn ignition to OFF. Test all remotes to ensure proper programming.
Programming for 94 Dodge Ram Van
Obtain all remote transmitters for this vehicle.
1. Open the glove box and lower down by releasing catch tabs.
2. Insert key into ignition and turn ignition switch to the ON position. (Just shy of cranking the engine)
3. Find the program connector behind the glove box and jump to ground. This means to take a wire and contact the metal in the connector to a non-painted metal surface that is a suitable ground. When done properly the door locks will Lock and then Unlock automatically. The vehicle is now in programming mode.
4. Press any button on the remote. The doors will again Lock and Unlock automatically when the signal has been received from the remote and programmed successfully. Repeat this step for each remote that needs to be programmed to the vehicle.
5. Remove the jumper wire to ground and the programming procedure is now done. Test each remote to ensure it functions.
Programming for 95-97 Dodge Ram Van
Obtain all remote transmitters for this vehicle.
1. Identify the programming connector. It will be on the drivers side under the dash taped to the wiring harness just to the left of the steering column. It will be a single green wire with a black rubber insulator on the end of it.
2. Using a suitable jumper wire jump the programming connector to ground. This means contact the metal in the connector with one end of the wire and contact a non-painted metal surface with the other end of the wire.
3. Insert key into the ignition and turn the ignition switch to the ON position. (Just shy of cranking the engine)
4. Press any button on the first remote. The locks will cycle from Lock to Unlock to show successful programming. Repeat this step for each additional remote to be programmed.
5. Remove jumper wire, turn ignition to OFF and remove key. Test all remotes to ensure they function.
Programming for 95 Chrysler Lebaron
Obtain all remote transmitters for this vehicle.
1. Remove the middle vent bezel from the center of the dashboard. Locate the 6 pin traction control connector behind the vent. It will be black in color. Connector should be connected to the vent bezel or the traction control switch, if connected to the traction control switch you must unplug it.
2. Insert key into ignition and turn ignition switch to the ON position.
3. Using a jumper wire or a paper clip bent in the shape of a "U" jump pin 1 to pin 4. Ensure there are metal contacts or pins in cavities 1 and 4. When done properly the doors will automatically lock and then unlock to show that vehicle is in programming mode.
4. Press any button on the first remote to be programmed. Locks will cycle again to indicate vehicle recognized remote. If programming a second remote press any button on second remote to be programmed, locks will cycle again to indicate that second remote was recognized.
5. Programming is now complete, turn ignition to OFF position, remove jumper wire, and test remotes to ensure proper programming.
