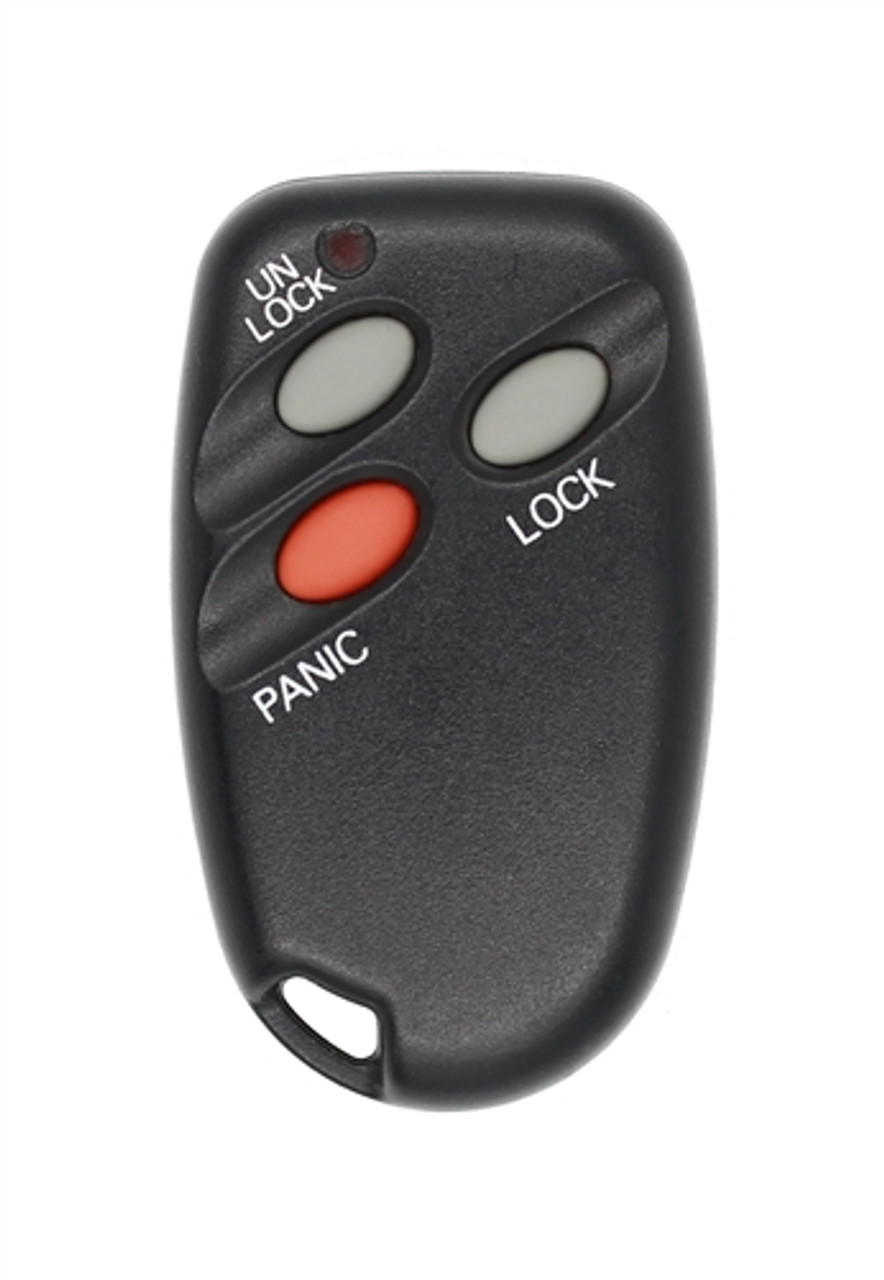


This is a Factory OEM (Original Equipment Manufacturer) Mitsubishi 3 Button keyless entry remote, aka "key fob".
Mitsubishi
- 2000 Chrysler Sebring
- 2000 Dodge Avenger
- 1999 Chrysler Sebring
- 1999 Dodge Avenger
- 1999 Mitsubishi Eclipse
- 1998 Chrysler Sebring
- 1998 Dodge Avenger
- 1998 Eagle Talon
- 1998 Mitsubishi Eclipse
- 1997 Chrysler Sebring
- 1997 Dodge Avenger
- 1997 Eagle Talon
- 1997 Mitsubishi Eclipse
- 1996 Chrysler Sebring
- 1996 Dodge Avenger
- 1996 Eagle Talon
- 1996 Mitsubishi Eclipse
- 1995 Chrysler Sebring
- 1995 Dodge Avenger
- 1995 Dodge Stealth
- 1995 Mitsubishi Eclipse
- 1994 Dodge Stealth
- 1993 Dodge Stealth

Diagram of Data Link Connector (DLC)
Obtain all remote transmitters for this vehicle.
1. Insert key into the ignition. Do not turn ignition switch, leave in OFF position.
2. Locate the Data Link Connector (DLC). It will be under the dash on the driver's side. Use the diagram above to identify pins 1 and 4. Notice that the DLC connector is tapered. You can use this to help identify the proper pins. Using a suitable jumper wire jump pin 1 to pin 4. Ensure that there are metal connector ends in the cavities that are referenced in this procedure. Once the jumper wire is installed it needs to remain there throughout this process until instructed to remove.
3. Close all vehicle doors. Turn the ignition switch to the ACC position and then back to OFF. This must be done within 10 seconds of installing the jumper wire. If all is done properly then the locks will automatically cycle Lock and Unlock. This means the vehicle is in programming mode and you are ready to program your remotes.
4. Depress either the LOCK or UNLOCK button on the first remote to be programmed three times within ten seconds. If the remote is successfully programmed then the locks will again automatically cycle Lock to Unlock.
5. To program an additional remote repeat step 4 and after remote is programmed you should see the door locks cycle automatically from Lock to Unlock. This step must be completed within one minute of programming the first remote.
6. Disconnect the jumper wire and remove the key from ignition at this point as the programming is done. Test all remotes to ensure proper programming.
Obtain all remote transmitters for this vehicle. This procedure's a little more complicated than others, we recommend having someone help you perform this procedure. We have found it easier to have one person manage the jumper wire while the second person performs the procedure.
1. Locate the Data Link Connector (DLC). It will be under the dash on the driver's side. You may need to lay on the floor and look up to easily access it. Use the diagram above to identify ports 1 and 4. Notice that the DLC connector is tapered. You can use this to help identify the proper ports. Be sure there's metal contact pins in ports 1 and 4.
2. Insert key into the ignition and leave in the OFF position.
3. Using a suitable jumper wire, jump pin 1 to pin 4. The jump means to make a connection between the two pins using any metal wire. A paperclip bent in the shape of a "U" usually works perfectly. Be certain the jumper wire makes contact with the pins in ports 1 and 4. Once the jumper wire is installed it needs to remain there throughout this procedure until instructed to remove.
4. Within ten seconds of connecting the jumper wire, turn the ignition switch to ACC then back to OFF. (ACC is the position when you turn the key back toward you, OFF is the position where you can remove your key). The doors will automatically lock and unlock once indicating the vehicle is in programming mode.
5. Now press the LOCK or UNLOCK button on the first remote to be programmed THREE TIMES within ten seconds. The doors will automatically lock and unlock once indicating the vehicle has programmed that remote.
6. If you have additional remotes to program, repeat step 5. within one minute.
7. Once all remotes are programmed remove jumper. Test all remotes to ensure proper programming.
1. Insert key into ignition and do not turn. Leave in the OFF position.
2. Locate the Data Link Connector (DLC). It will be under the dash on the driver's side. Use the diagram above to identify pins 1 and 4. Notice that the DLC connector is tapered. You can use this to help identify the proper pins. Using a suitable jumper wire jump pin 1 to pin 4. Ensure that there are metal connector ends in the cavities that are referenced in this procedure. Once the jumper wire is installed it needs to remain there throughout this process until instructed to remove.
3. Turn the ignition switch to the ACC position and then back to OFF. This must be done within 10 seconds of installing the jumper wire. If all is done properly then the locks will automatically cycle Lock and Unlock. This means the vehicle is in programming mode and you are ready to program your remotes.
4. Depress either the LOCK or UNLOCK button on the first remote to be programmed three times within three seconds. If the remote is successfully programmed then the locks will again automatically cycle Lock to Unlock.
5. To program additional remotes to repeat step 4 and after each remote programmed you should see the door locks cycle automatically from Lock to Unlock.
6. Disconnect jumper wire and remove the key from ignition at this point as the programming is done. Test all remotes to ensure proper programming.
We are proud to offer true OEM key fobs direct to you at up to 80% off dealer prices. There is a catch though, so here it goes:
You need to know the only way to get a NEW OEM key fob is to go to a dealer or authorized reseller of OEM parts, and you will pay dealer prices if you do this and spend hundreds of dollars.
The key fob you are going to purchase from us is used or as we like to say "previously loved". We recycle OEM key fobs and put them through a rigorous refurbishing process so we can guarantee our products and offer them at a reasonable price along with saving the environment. Oh, and we are not robbing you of your hard-earned dollars as the dealership does. So if you are good with all of this what are you waiting for? Make your life easier, order a key fob from us and save the world!
